StudyQuell
User & Author Guide
Welcome to the official documentation for StudyQuell.com. This guide will walk you through everything from creating an account to publishing your own content and earning money.
Welcome Aboard!
Whether you are here to learn, download materials, or share your own knowledge as a verified author to generate an income, this guide has you covered. Let's build something great together!
1. Account Creation & Verification
Step 1: Sign Up
To join the StudyQuell community, you first need to create an account.
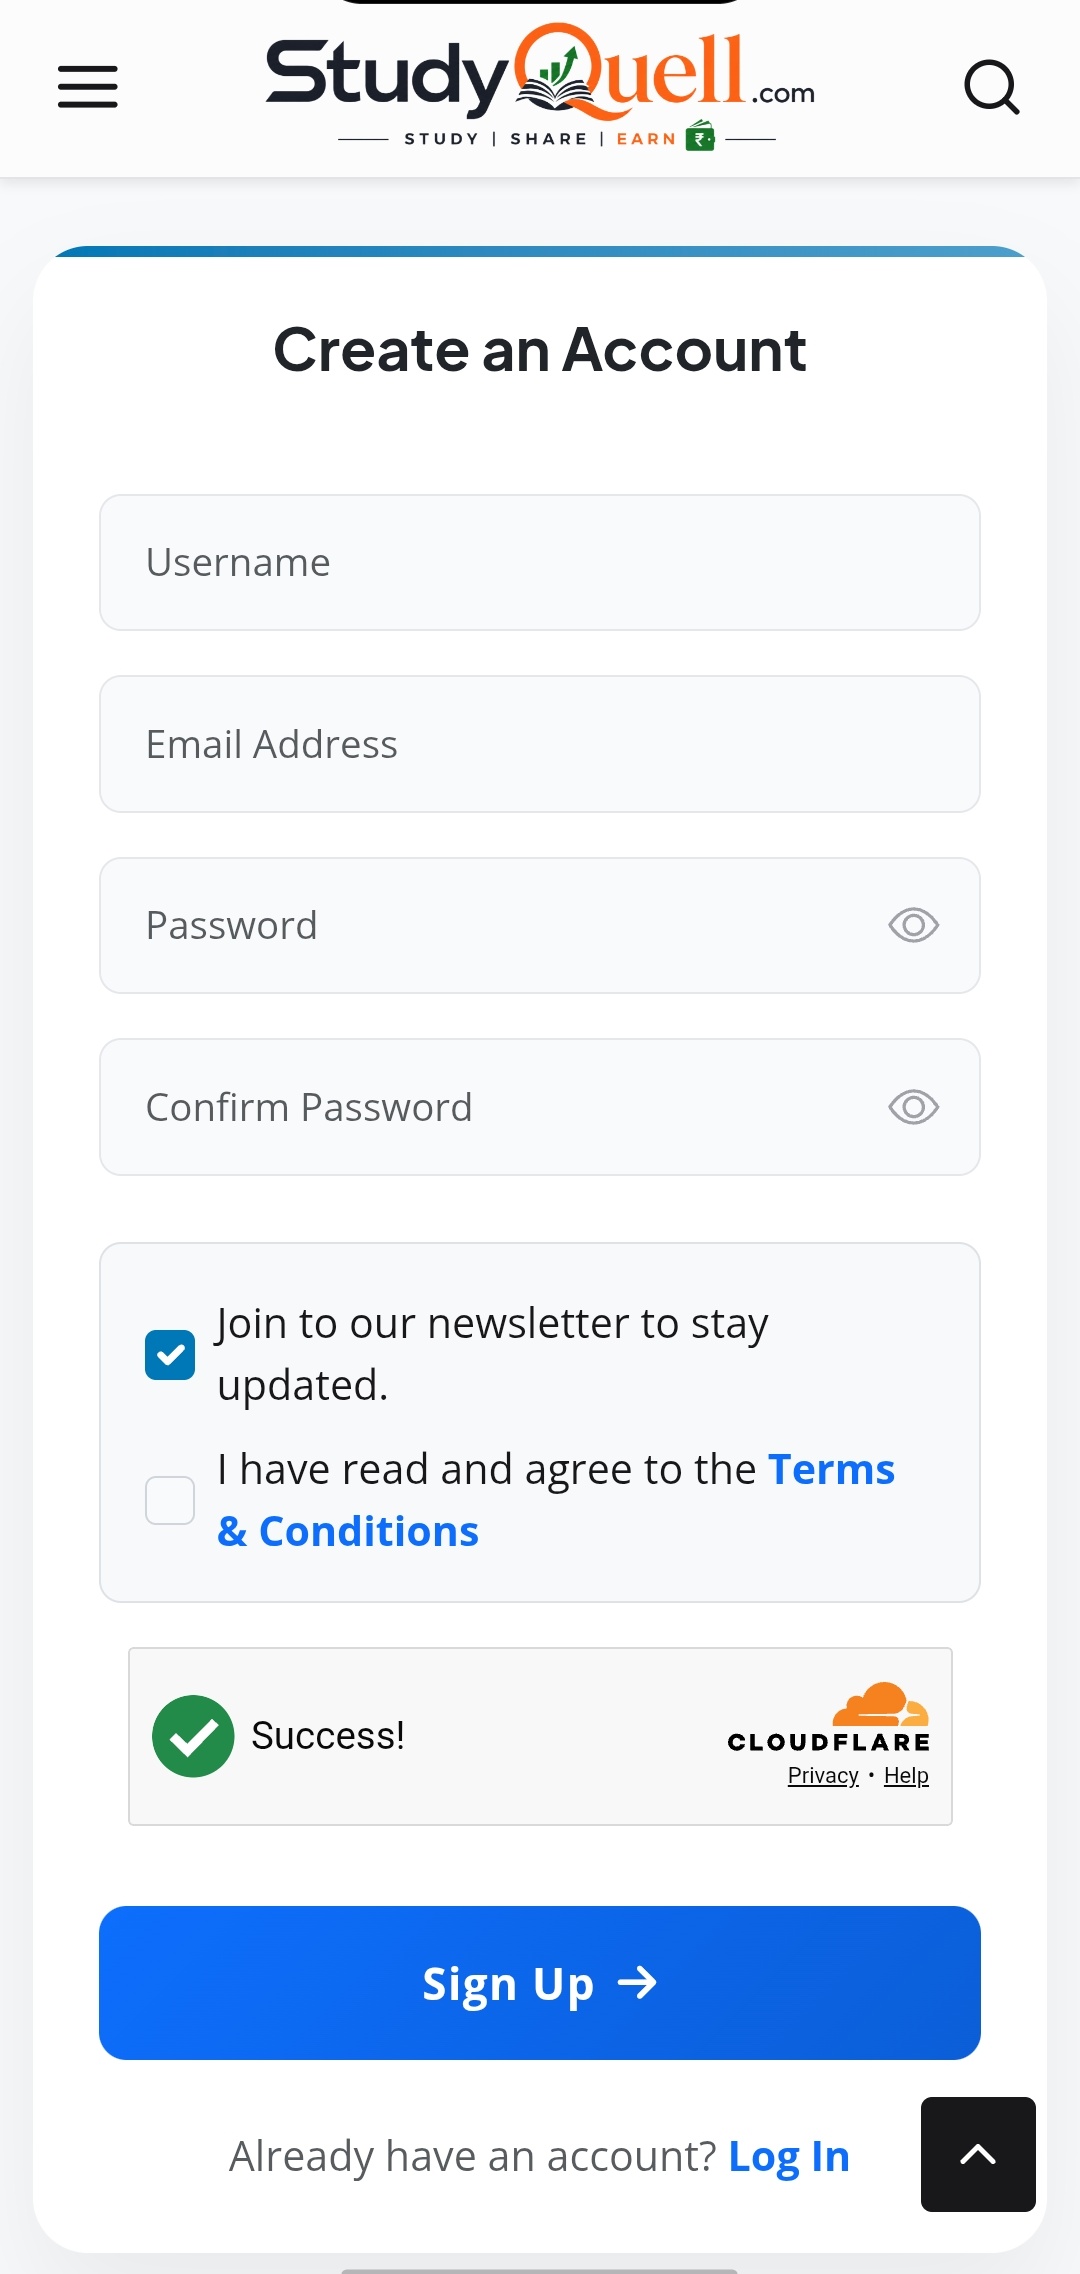
- Navigate to our registration page: https://studyquell.com/sign-up
- Enter your desired Username, a valid Email Address, and a strong Password.
- Re-enter your password to confirm it.
- Check the Privacy Policy & Terms box to agree to our rules.
- (Optional) Check the Newsletter box if you wish to receive updates from us.
- Click the Sign Up button.
Screenshot: Registration Form
Step 2: Email Verification (Crucial)
Before you can fully use your account or apply to be an author, you must verify your email address.
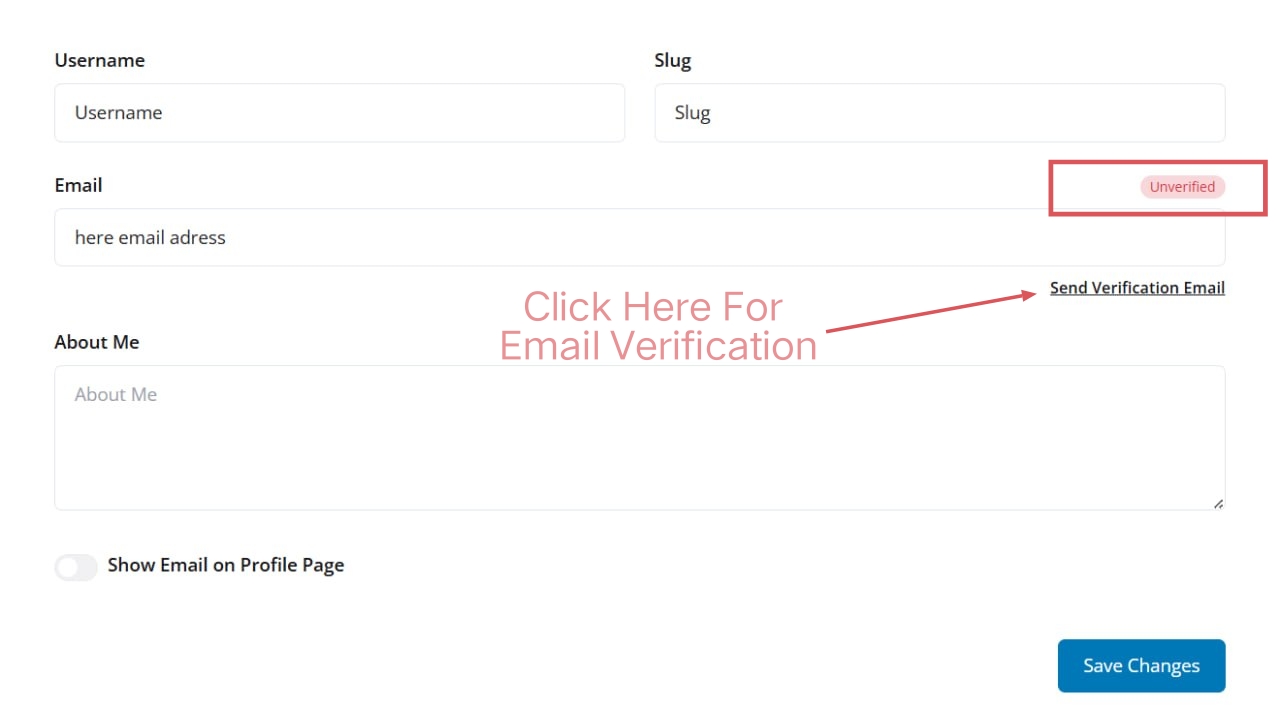
- Go to your Account Settings: https://studyquell.com/account-settings
- Look at the Email input box. Just above it, you will see a red Unverified status.
- Below the email box, click the link that says "Send verification link on email".
Screenshot: How to Send Verification Link
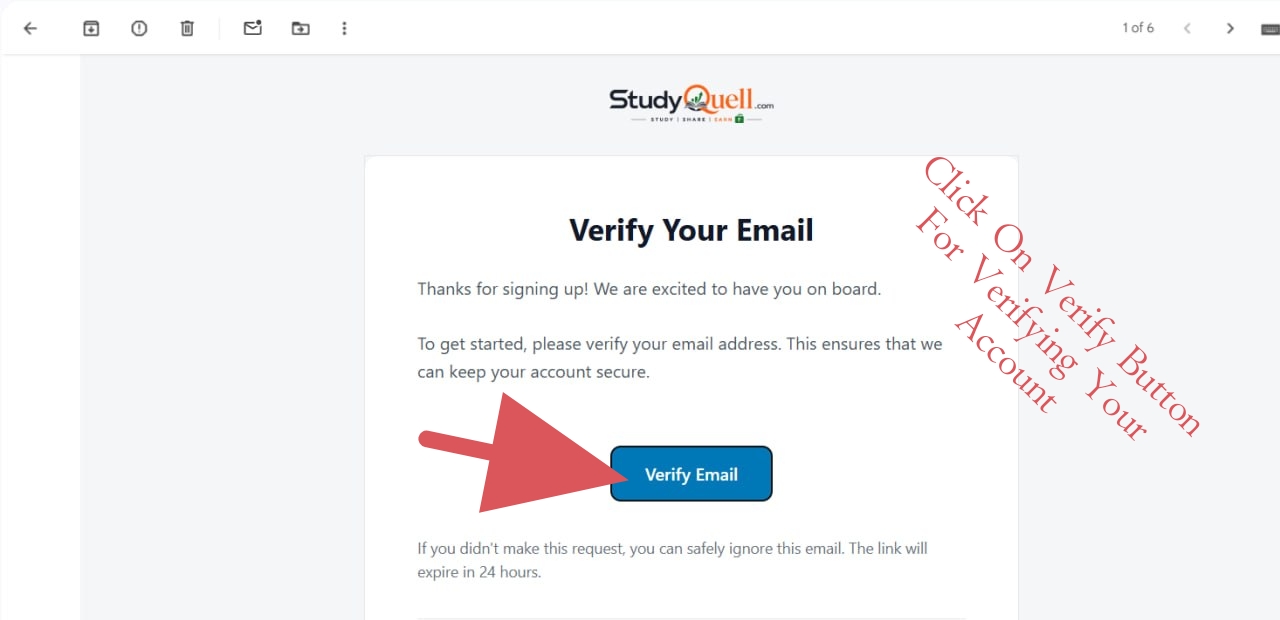
- Check your email inbox (the one you used to register). You will receive an email from StudyQuell.
- Open the email and click the verification link inside it.
Screenshot: Email Received
- Once clicked, return to your Account Settings. You will now see a green Verified badge next to your email!
Screenshot: Email Verified Status

2. Managing Account Settings
Your Account Settings area is your personal hub. Let's break down what you can do on each page.
| Setting Menu | Description & URL |
|---|---|
| Profile Settings |
Customize your public identity. Update your First Name, Last Name, and modify your personal profile URL slug. You can also upload an avatar here. Manage Profile |
| Social Accounts |
Authors and users can link their external social media profiles (Facebook, Twitter, Instagram, etc.). These links will appear on your public profile page. Manage Social Links  |
| Manage Subscription |
If you have purchased a premium membership plan, you can view your active status, billing cycle, and expiration date here. Manage Subscription 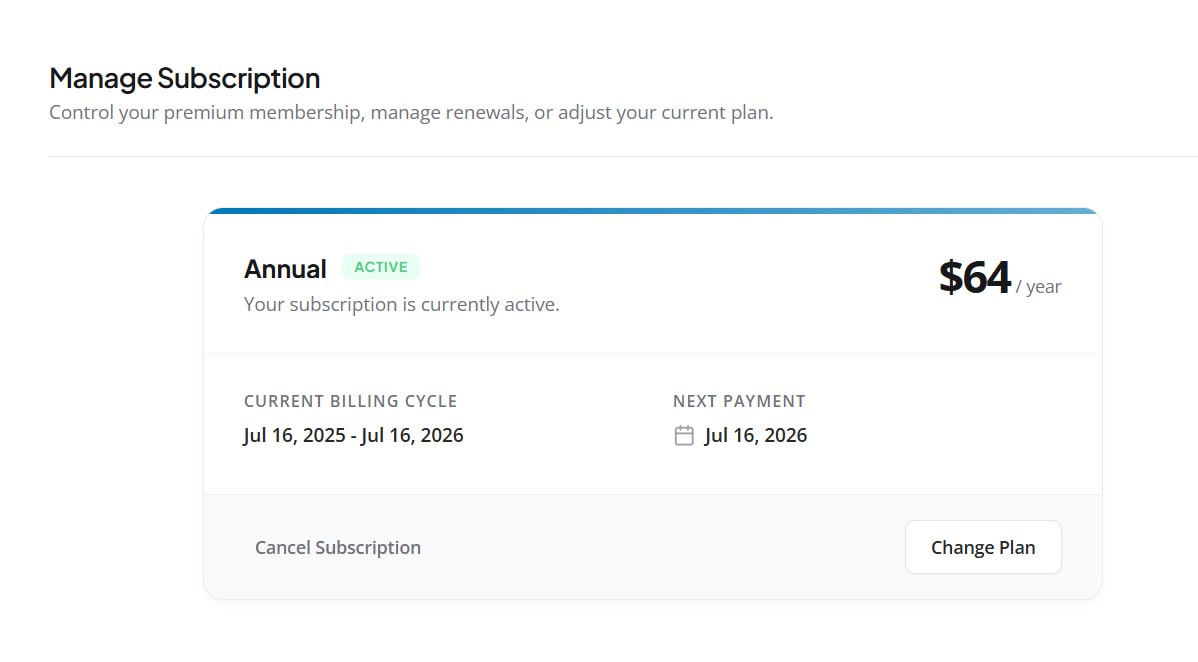 |
| Purchased Content |
Any exclusive content you have bought (Premium Posts, PDFs, Test Series, etc.) will be listed here. You can click direct links from this page to view your purchased materials. View Purchased Content  |
| Billing Details |
Store your billing information (Name, Address, Tax ID) for generating accurate invoices on your purchases. Update Billing 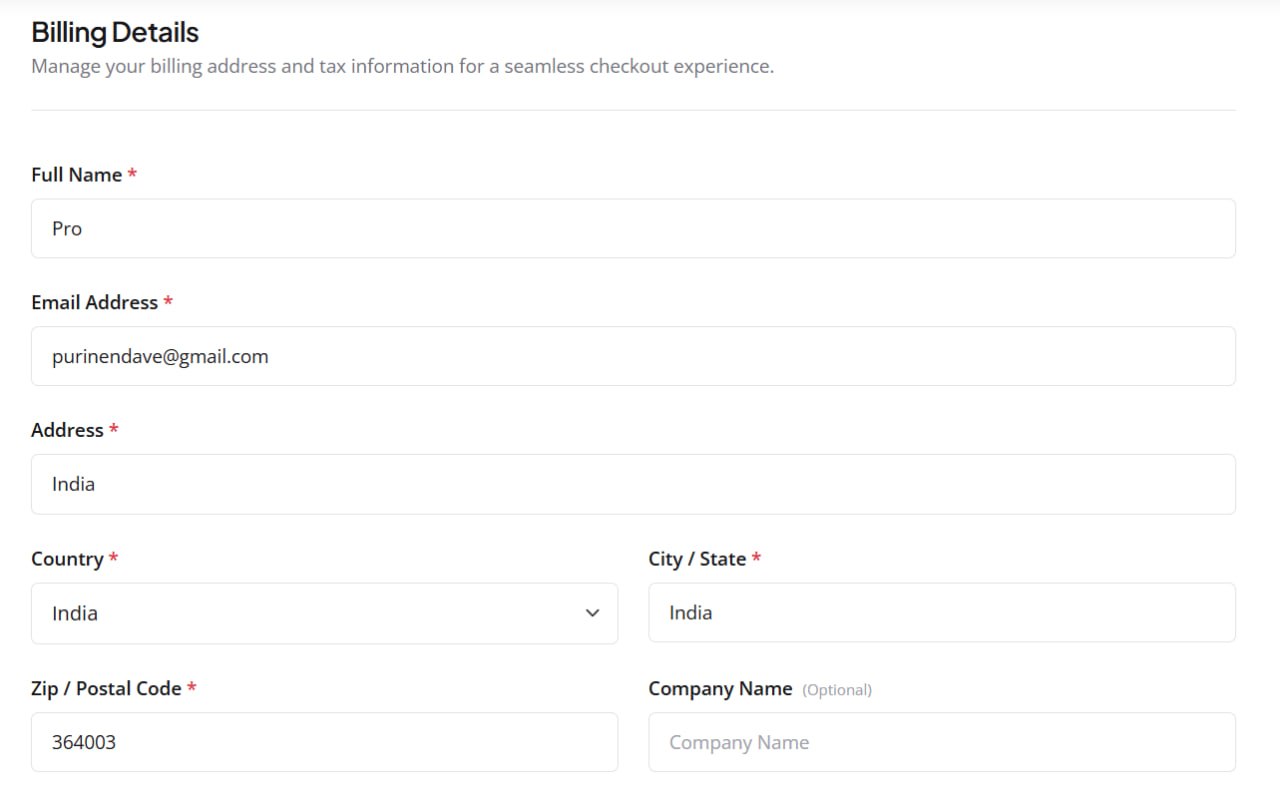 |
| Payment History |
Your financial ledger. Keep track of every payment you've made on StudyQuell for subscriptions or single content, and download your invoices. View Payment History 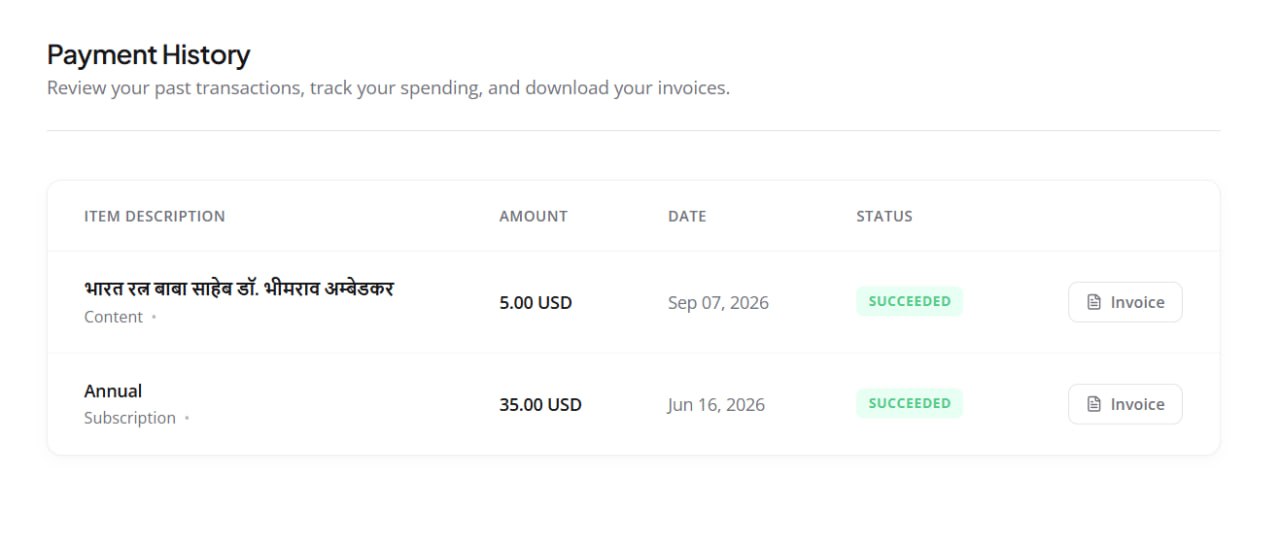 |
| Change Password |
Securely update your login password. You will need to enter your current password to set a new one. Change Password  |
| Delete Account |
We value your privacy. If you wish to leave the platform, you can permanently delete your account here. You must enter your password to confirm deletion. Delete Account 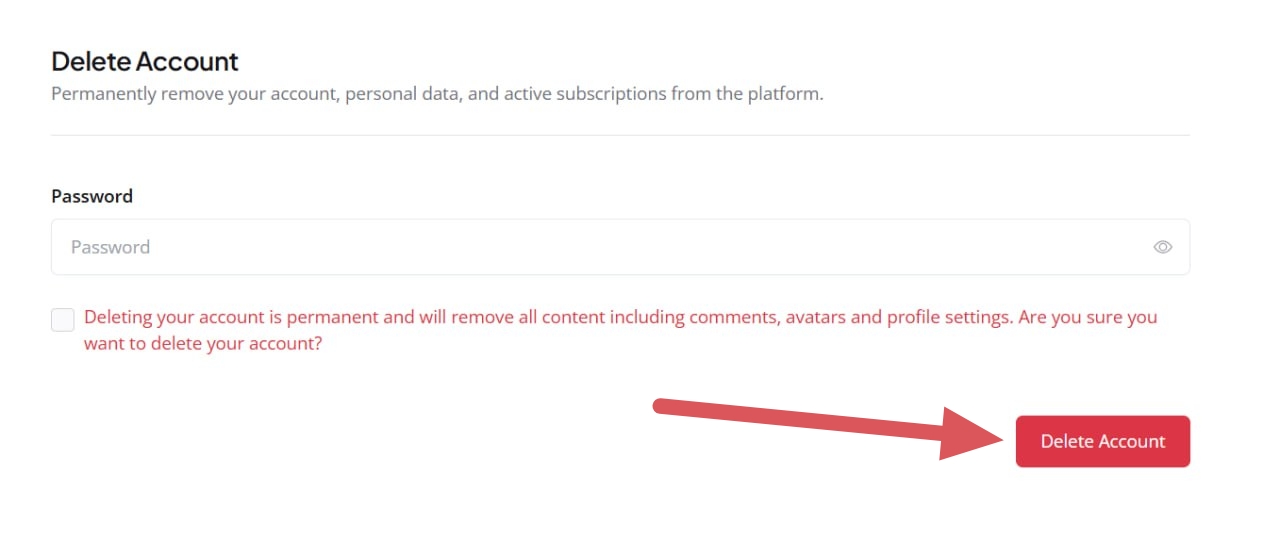 |
3. Becoming an Author
StudyQuell empowers knowledgeable users to share their expertise and get paid for it! As an author, you can upload posts, PDFs, and study materials, and earn money based on the traffic your content generates.
Step 1: Submitting Your Application
To become an author, you must apply and be approved by our moderation team.
- Navigate to the Author Application page: https://studyquell.com/become-an-author
- Fill out the application form with your First Name, Last Name, and Email.
- Provide detailed information about your expertise and subjects you plan to write about.
- If you have previous work, a portfolio, or a blog, include those links (this increases your chances of approval).
- Submit the form. It will be sent to our moderation team for review. If approved, your account will be upgraded to an Author Account.
Read the Author Rules!
Before publishing, please read our strict author guidelines. Plagiarism, spam, or low-quality content is not tolerated. Read the rules here: Author Instructions.
Step 2: Monetization Requirements
Just getting approved as an author allows you to post content, but monetization is not turned on immediately.
To unlock CPM-based earnings (getting paid per 1,000 views), you must first prove the quality of your content. You need to gather between 500 to 1,000 valid, organic views on your published posts. Once you hit this milestone, your monetization will be activated by admins, and your earning counter will begin!
Step 3: The Author Dashboard Overview
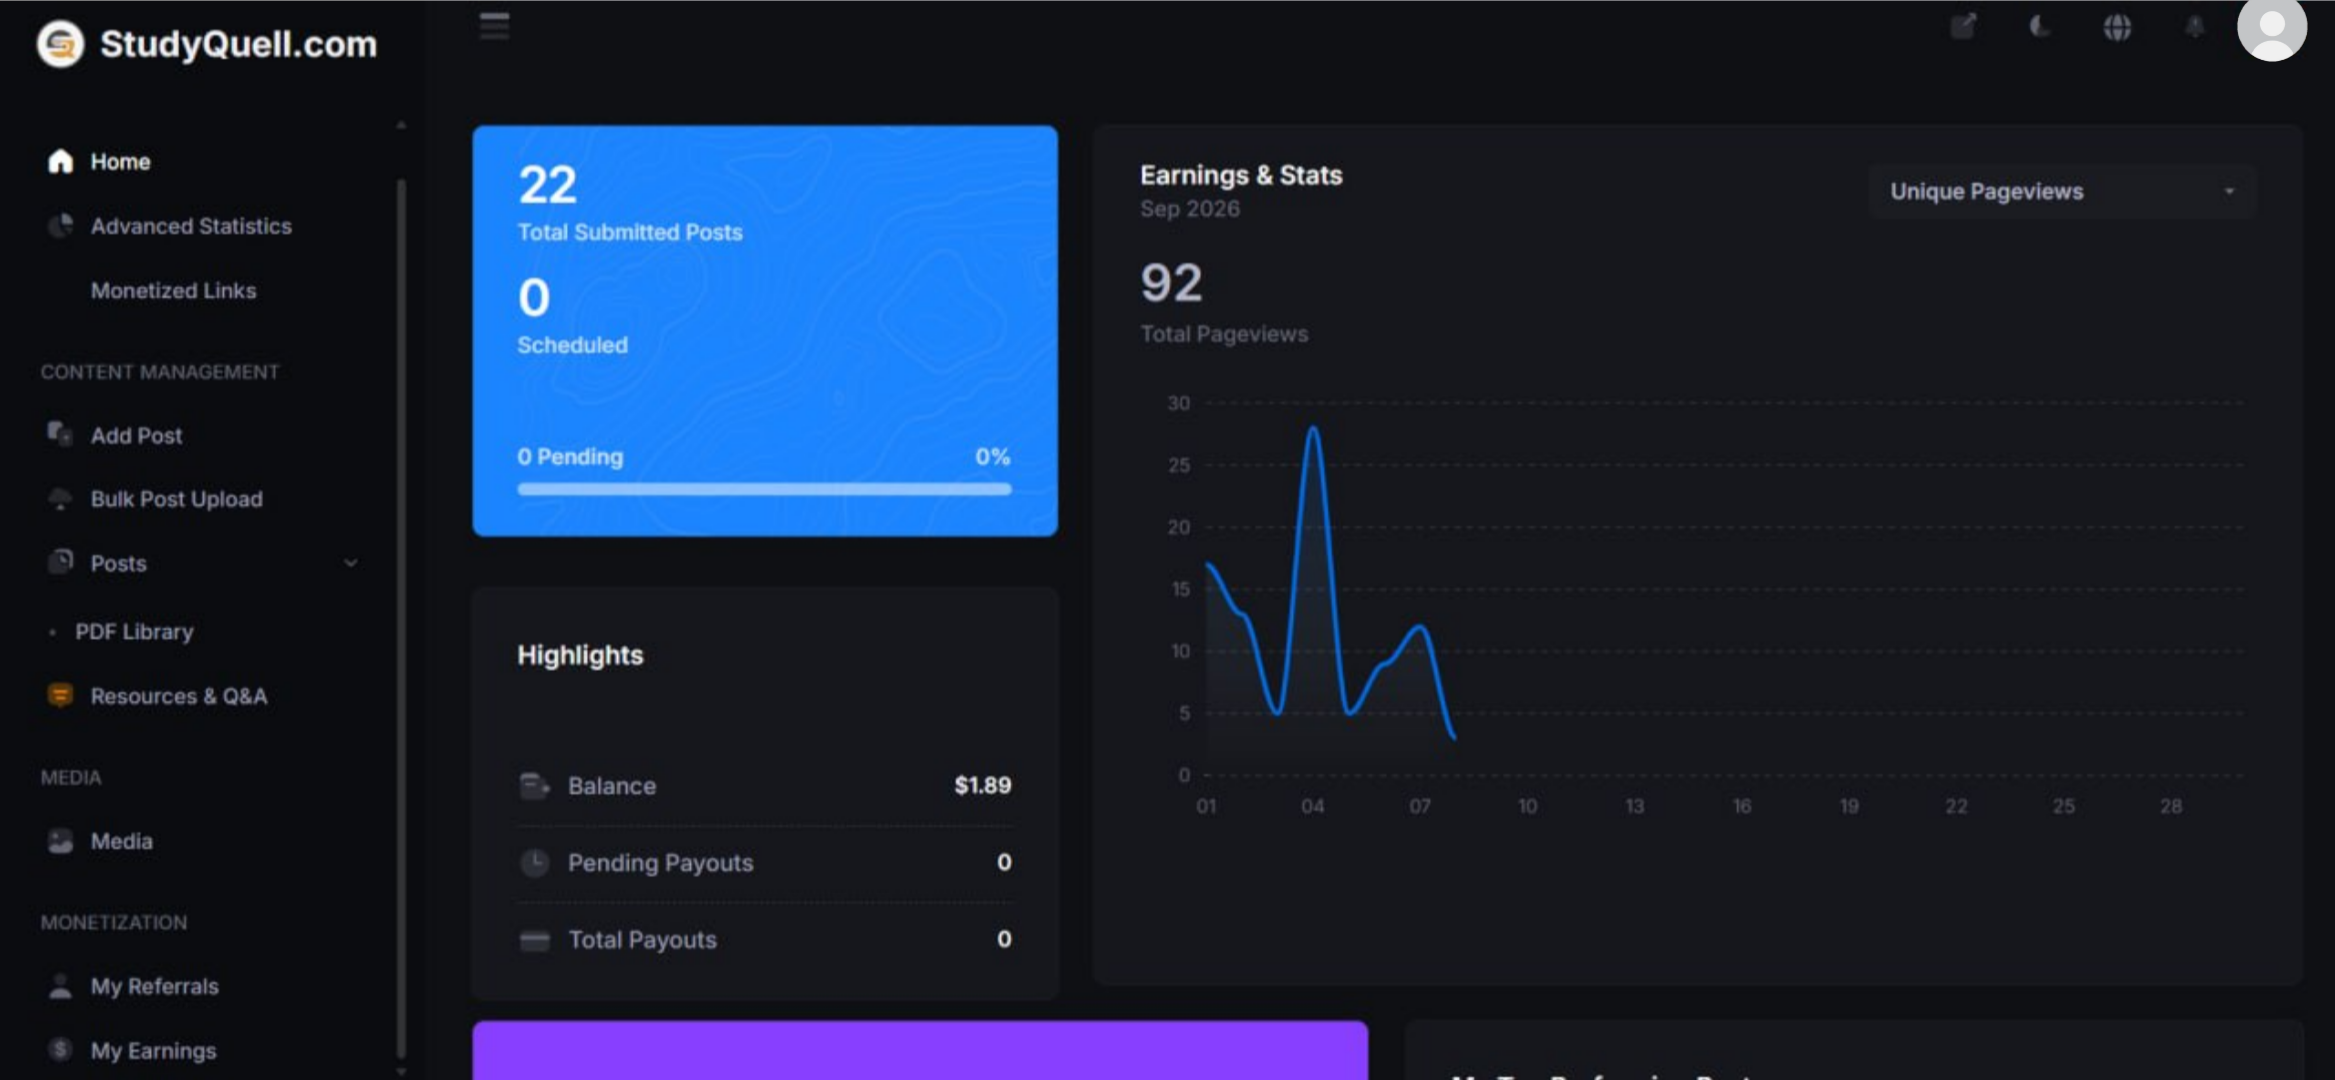
Once your account is upgraded, you will get access to a special Author Panel.
Screenshot: Author Dashboard Home
Content Metrics
On the dashboard home, you will see exactly how many posts you have published, and how many of your submitted posts are currently "Pending" approval by the admin team.
Highlights & Earning Card
Once monetized, this card shows your financial status: your current Balance ($), funds waiting to be sent (Pending Payouts), and money you have successfully withdrawn (Total Payouts).
Advanced Statistics & File Sharing
StudyQuell provides custom tools to help authors track their success and share resources securely.
-
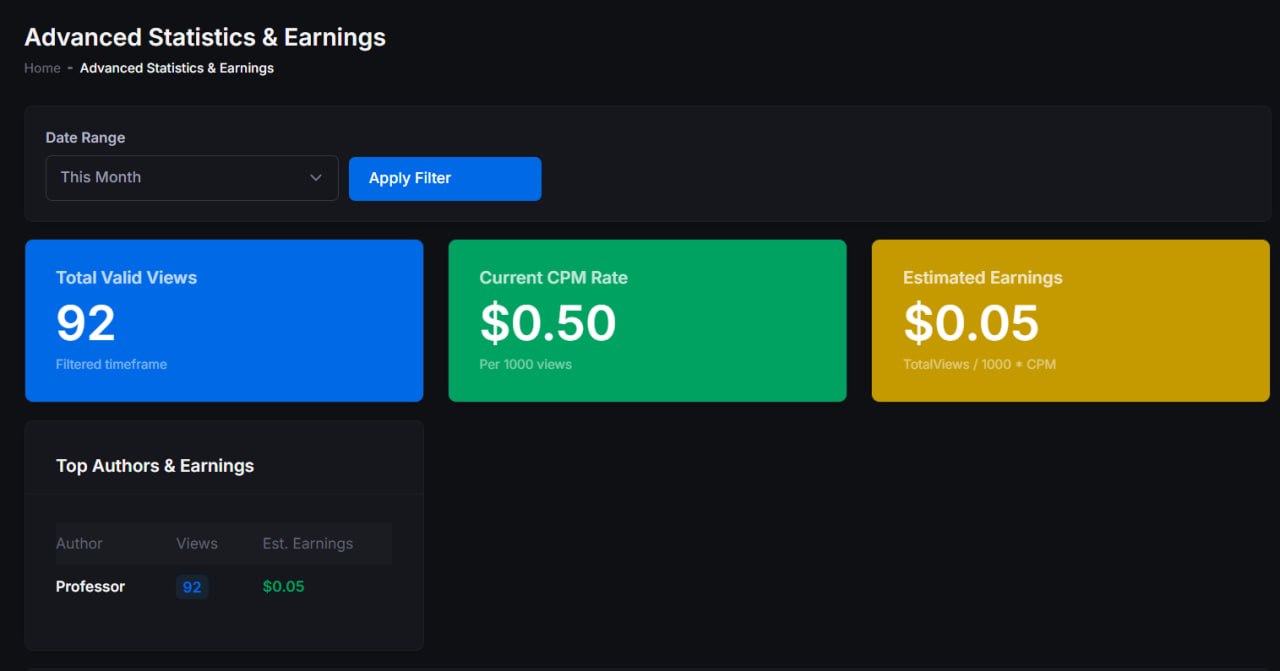
Advanced Statistics Panel
Located at Advanced Stats. Here, authors can filter their traffic by a specific date range to analyze which posts are gaining the most traction and popularity.
-
SQ Download Link Generator
If you want to share a PDF or study material with your readers, you cannot just paste a direct Google Drive link. You must go to SQ Downloads. Enter your third-party link (like Google Drive) here to generate a Secure Monetized Link. You then share this newly generated SQ link in your posts!

4. Add Post & Formats
The "Add Post" module is the core of your content creation engine. To start writing, navigate to Add Post. StudyQuell offers a highly versatile publishing system with distinct post formats designed for educational content.
Screenshot: Choose Format Screen

Available Post Formats
Select the format that best fits the type of content you want to create:
A standard text article with images and embed videos. Perfect for notes and blogs.
A collection of images navigated by next/previous buttons.
A top-10 style list based article with numbered items.
List of links based on nested headings. Great for long guides.
Upload or embed YouTube/Vimeo videos, or create an audio playlist.
Create engaging Trivia/Personality quizzes, or list scheduled educational events.
Upload a PDF to automatically create an interactive 3D Flipbook reader. This format allows users to read your study materials like a real book, while displaying ads alongside it to help you generate revenue.
Add PDFs, Study Material, Solutions, and Q&A. Hidden from Homepage. This format does not show up on the main site feed. It is only accessible to users who have the direct URL. Perfect for exclusive link-sharing.
Common Editor Settings
No matter which format you choose, you will use the primary editor. Here is what you need to know:
| Setting | Description |
|---|---|
| Title & Slug | The main headline of your post. The slug (URL) generates automatically based on your title. |
| Summary | A brief excerpt displayed on category pages and search engine results. Keep it engaging! |
| Content Editor | The main writing area. Use the toolbar to bold text, add lists, or insert images. You can also use the Add Image button to pick files from your Media library. |
| Category & Tags | Select the most relevant category from the right sidebar. Add comma-separated Tags (e.g., math, algebra, notes) to help users find your content. |
| Main Image | Upload a featured thumbnail. This is the cover image that represents your post everywhere on the website. |
| SEO Meta Options | At the bottom of the page, define a Meta Title and Description. This helps your post rank higher on Google search results. |
5. Manage Your Posts
The Posts menu on your left sidebar is where you organize everything you have written. You can view published articles, edit existing ones, or check the status of your pending submissions.
| Menu Item | Function |
|---|---|
| Posts | Displays a complete list of all your content that is currently live and public on the website. |
| Pending Posts | If your account is set to require editorial review, your newly submitted posts will land here. They stay hidden until an admin reviews and publishes them. |
| Drafts | Contains unfinished posts that you have saved for later. You can come back here anytime to finish and publish them. |
Quick Actions
Next to every post in your list, you will see an Options button. Clicking this opens a dropdown menu allowing you to:
- Edit Re-open the editor to fix a typo, add new information, or update the main image.
- Delete Permanently remove the post from your account and the database.
6. Media Library
Navigate to Media. This is the central file manager for your author account. Every image, PDF, audio, and document you upload while creating posts is safely stored here.
Screenshot: Media Manager

File Organization
To keep your storage organized, the system automatically separates your uploads into tabs:
| Tab Name | Description |
|---|---|
| Main Images | Contains the primary cover thumbnails used for your standard articles. |
| Content Images | Images inserted inside the text editor or used in special formats (like Quiz questions). |
| Files | Holds downloadable documents like PDFs, Notes, Word files, or ZIP archives you share in the Resource or PDF Document post formats. |
Direct Media Access
You don't need to visit this page to upload files. Whenever you click "Add Image" or "Select File" while writing a post, a popup version of this exact Media Library will open, allowing you to upload and insert files seamlessly.
7. My Referrals (Earn 5%)
Want to earn passive income? StudyQuell offers a lucrative referral program for our authors. You can invite your friends, students, or fellow creators to join the platform using your unique referral link.
How the 5% Commission Works
When someone creates an account using your referral link and becomes an author, they become your referral. Every time that referred author requests a successful payout from their own earnings, you will automatically receive a 5% bonus commission credited directly to your balance! (This 5% is a bonus from us, it is not deducted from their earnings).
Tracking Your Referrals
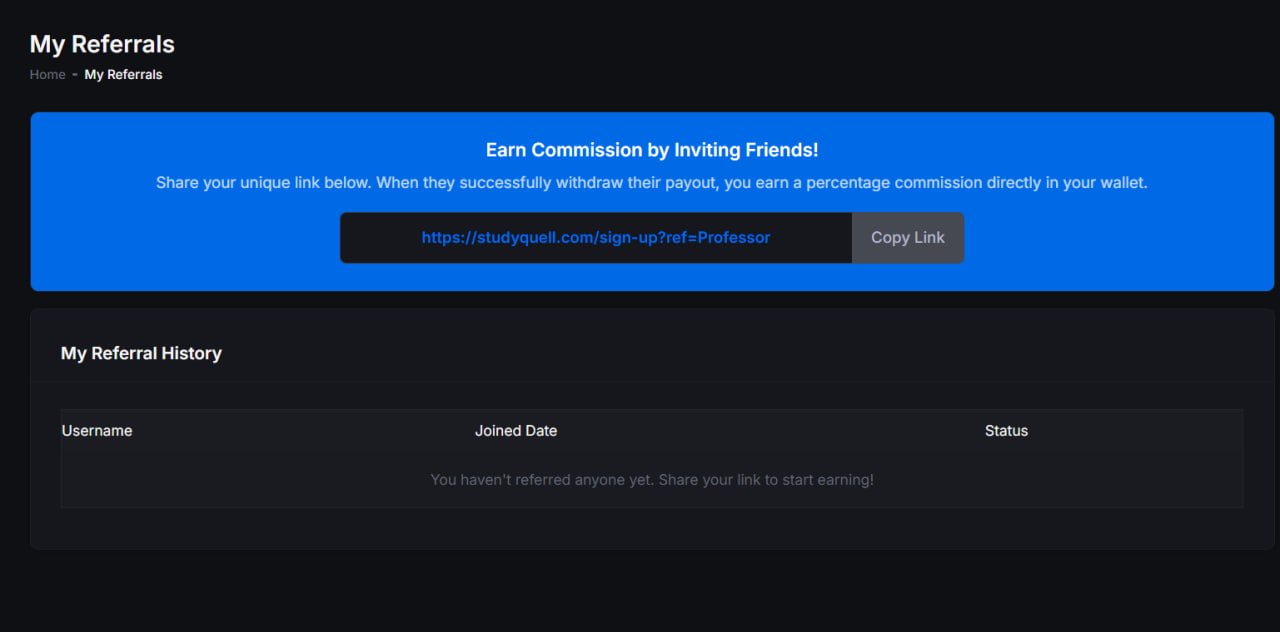
Navigate to My Referrals. On this page, you will find:
- Your Unique Link: Copy this link and share it on your social media, YouTube descriptions, or WhatsApp groups.
- Registered Users List: A complete table showing exactly who registered using your link and the date they joined.
- Earnings Tracking: Watch your passive income grow as your referred users succeed on the platform!
Screenshot: My Referrals Page
8. Earnings & Payouts
Navigate to Earnings. This is your personal financial hub. Here, earning authors can track their article views, check their current balance, configure payment methods, and withdraw their money.
Earnings Overview
At the top left of the page, you will see your personal performance statistics:
Balance
The total amount of money you have earned that is ready to be withdrawn.
Pageviews
The total number of verified, unique human views your articles have generated.
Screenshot: Author Earnings Dashboard

Setting Up a Payout Account
Before you can request your earned money, you must tell the system where the funds should be sent. By clicking the Set Payout Account button, you can securely save your personal details for different payment methods.
| Payment Method | Required Information |
|---|---|
| PayPal | Enter the email address linked to your active PayPal account. |
| Bank Transfer / IBAN | Enter your Full Name, Country, Bank Name, and your Account Number (or IBAN/SWIFT) depending on local availability. |
| UPI / Other | If the admin has enabled local methods like UPI, simply provide your VPA ID (e.g., yourname@bank). |
Screenshot: Set Payout Account Modal

Requesting a Payout
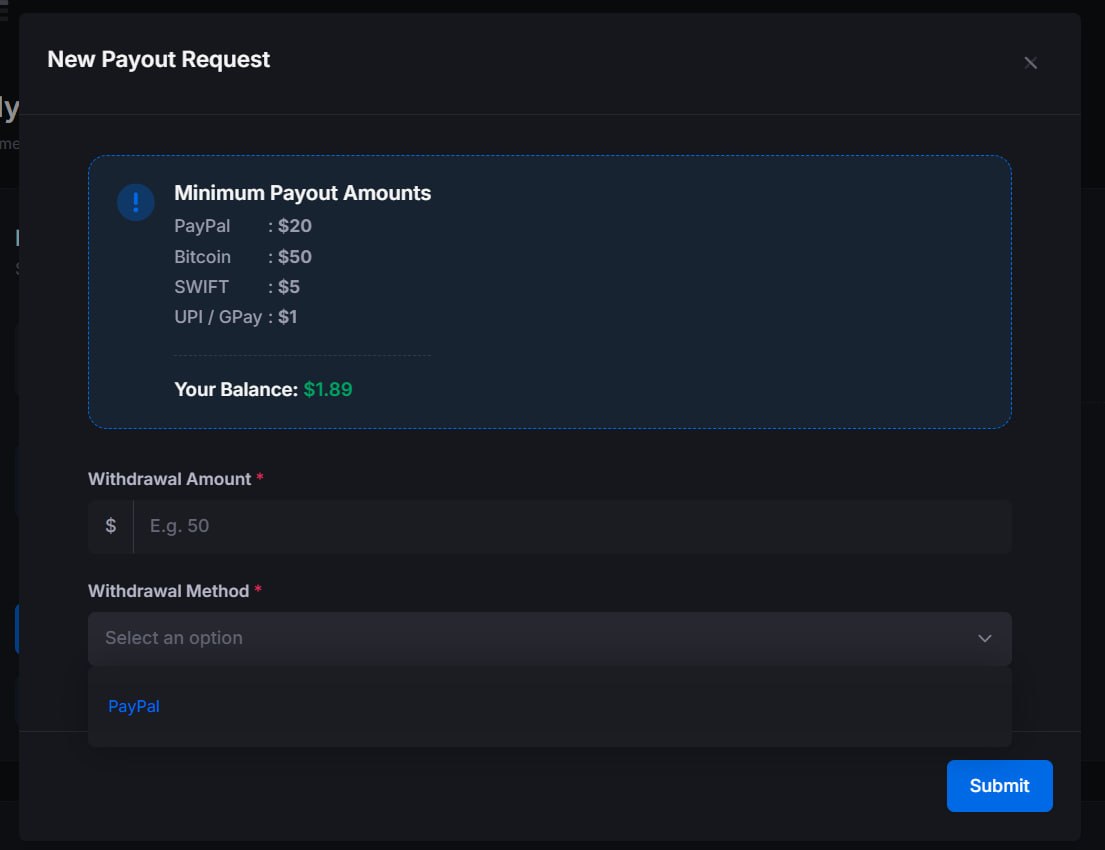
Once you have earned enough money, click the New Payout Request button. Enter the amount you want to withdraw and select your preferred payment method.
Minimum Withdrawal Limits
You cannot request a payout if your balance is below the minimum limit set by the admin for your chosen payment method. These exact limits are displayed directly inside the payout request window.
Screenshot: New Payout Request Form
Payouts History
The large table on the right side of the screen displays your past and pending payout requests. You can track the status of your money here. Once the site admin processes your payment, the status will update to Completed.